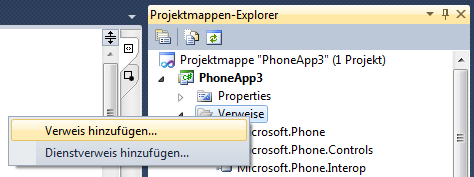
Um tolle Windows Phone UI-Elemente, wie etwa das Pivot-Element, benutzen zu können, muss der Microsoft.Phone.Controls Namespace deklariert werden. Dazu muss man seinem Projekt einen Verweis auf die „Windows Phone Controls“-Assembly (Bibliothek) hinzufügen (Verweis hinzufügen -> .NET -> Microsoft.Phone.Controls):


Achtung: Der Verweis kann nur hinzugefügt werden, wenn das Silverlight for Windows Phone Toolkit installiert ist. Ob das Toolkit bereits installiert ist, erkennt man daran, ob ein Ordner namens Toolkit im Windows Phone SDK-Installationsort (z.B. C:\Program Files (x86)\Microsoft SDKs\Windows Phone\v7.1) vorhanden ist.
Sobald der Verweis vorhanden ist, kann man den Namespace in seiner XAML-Datei (z.B. MainPage.xaml) einbinden:
1
2
3
4
5
| <phone:PhoneApplicationPage
...
xmlns:controls="clr-namespace:Microsoft.Phone.Controls;assembly=Microsoft.Phone.Controls"
...
> |
<phone:PhoneApplicationPage
    ...
    xmlns:controls="clr-namespace:Microsoft.Phone.Controls;assembly=Microsoft.Phone.Controls"
    ...
>
Durch den Namespace controls stehen dann einem erweiterte Deklarationsmöglichkeiten zur Verfügungen, mit denen sich beispielsweise eine Pivot-Ansicht erstellen lässt:
1
2
3
4
5
6
7
8
| <controls:Pivot Title="PIVOT DEMONSTRATION">
<controls:PivotItem Header="Item 1">
</controls:PivotItem>
<controls:PivotItem Header="Item 2">
</controls:PivotItem>
<controls:PivotItem Header="Item 3">
</controls:PivotItem>
</controls:Pivot> |
<controls:Pivot Title="PIVOT DEMONSTRATION">
    <controls:PivotItem Header="Item 1">
    </controls:PivotItem>
    <controls:PivotItem Header="Item 2">
    </controls:PivotItem>
    <controls:PivotItem Header="Item 3">
    </controls:PivotItem>
</controls:Pivot>

